Knowing how to make slides is an essential skill for students today. Slides make your ideas easier to understand through clear visuals, whether for a class project, a research defense, or a public speaking task. Learning how to create a PowerPoint presentation will save you time, reduce stress, and make your work look professional.
In this article, you’ll discover simple steps to design strong slides, add visuals, and prepare for presenting. You’ll also find tips to avoid common mistakes and make your presentation stand out.
What is a PowerPoint Presentation?
A PowerPoint presentation is a set of slides created using Microsoft PowerPoint, one of the most popular tools for making digital presentations. Each slide works like a page where you can place text, images, charts, videos, and other elements. A PowerPoint presentation helps you share information in a clear, visual way.
Students use it for school projects, group assignments, term papers, and public speaking. Teachers apply it to explain new topics. Professionals use it in meetings and training.
Because of its wide application, knowing the basics of creating a PowerPoint presentation has become essential. If you learn this early, you’ll feel confident when it’s time to defend a project, present research, or even do my PowerPoint presentation for a class assignment or task.
Why Learning PowerPoint is Essential for Students?
PowerPoint is not just about slides. It’s about learning how to present your ideas with maximum impact. For students, these skills are valuable in many situations.
Project defense: When you finish a research or group project, you must clearly show your results. A good PowerPoint presentation makes your defense organized, visual, and professional.
Term papers and reports: Instead of handing in only a long document, you can summarize the main points into slides. This way, teachers and classmates understand your work faster.
Public speaking: Talking in front of a class can feel stressful. Having slides with visuals, keywords, and speaker notes helps you stay focused and confident.
Future careers: No matter the profession, you’ll likely need to present ideas. Learning the tools now prepares you for the workplace.
Avoiding bad presentations: We’ve all seen bad PowerPoint presentations with too much text, small font size, or messy layout. Learning the right practices helps you avoid these mistakes.
So, what is a PPT beyond being just slides? It’s also a visual support. An effective presentation can help visual learners understand ideas better, since they often remember pictures and charts more than text. Adding images, audio, or video creates a more impactful and attractive presentation. Finally, PowerPoint acts as a point of reference. It guides the speaker and the audience, making it easy to follow.
How to Prepare Your Content Before Starting a Presentation
Before you even open PowerPoint, the most important step is preparation. Good slides always come from a clear plan. Even the best design won’t save your presentation if your content is weak or disorganized.
Collect material.
Start by reviewing your notes, textbooks, or reliable online sources. Choose the important details that really support your topic. Don’t copy everything word for word. Pick only what helps explain your main idea. If you feel stuck, you can also look at summaries or even check an essay writing company website for inspiration, but always make sure you put things in your own words.
Determine your purpose.
Ask yourself, “What do I want my audience to learn or remember?” This single question will guide your structure. For example, if your goal is to inform, focus on facts and examples. If your goal is to persuade, include strong points and evidence.
Outline your ideas.
Write your main points in a notebook or a simple document. Arrange them in a logical order – introduction, key points, conclusion. This outline will later help you decide how many slides you need and what goes on each one.
Adapt your content to slides.
A PowerPoint presentation is not the same as a research paper. Avoid long paragraphs. Use bullet points, short sentences, and clear text boxes. Think about what your audience needs to see at a glance.
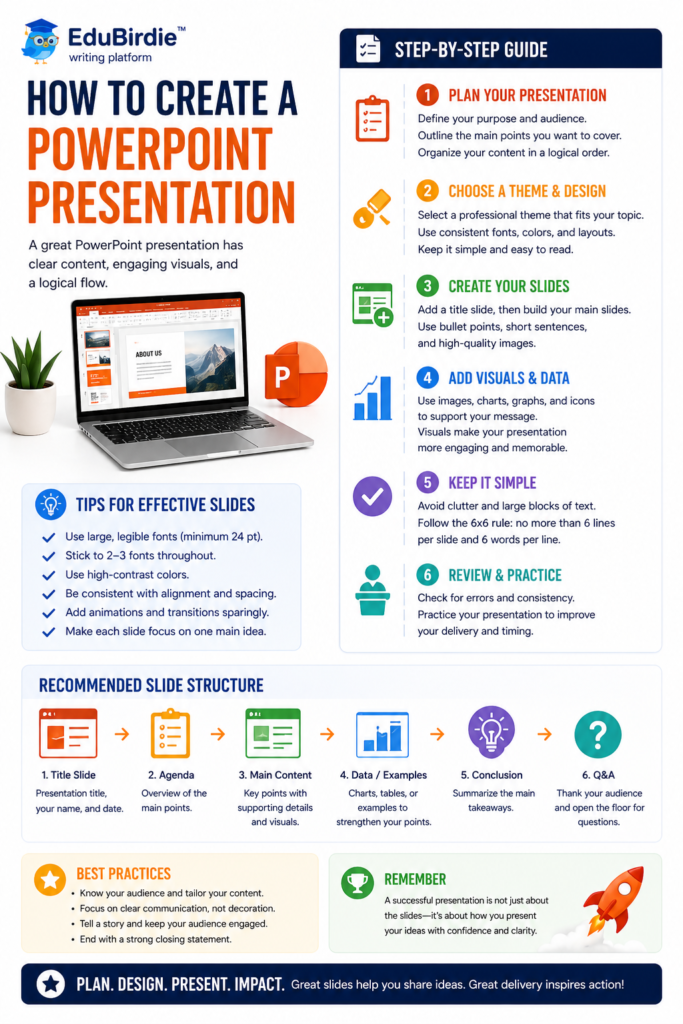
How to Create a PowerPoint Presentation Step by Step
Making a good PowerPoint presentation may seem challenging at first. But if you follow a clear step-by-step process, it becomes much easier. In this guide, we will show you how to make a PowerPoint presentation, from opening the program to presenting.
Step 1: Open PowerPoint and pick a design theme.
The first step is simple: open PowerPoint. You can do this from your computer or online through Office 365. Once you open it, you’ll see several options.
You can choose a blank presentation, which gives you a clean slate. This is perfect if you want full control over the design. You can also pick a pre-designed template. Templates come with built-in colors, fonts, and layouts, making your slides look professional instantly.
If you are editing an existing presentation, just select the file from your recent documents.
After choosing a blank slide or template, pick a design theme. PowerPoint has many themes under the Design tab. Click the one you like and select apply. Don’t worry if the colors or fonts aren’t perfect yet. You can always change them later to match your style or school colors.
💡Quick Tip: If you are making a presentation about “The Solar System,” a dark theme with bright text can make planets and stars stand out.
Step 2: Build your title slide.
Your title slide is like the cover of a book. It’s the first thing your audience sees, so it should be organized and effective.
Include these elements:
Title of your presentation – Make it bold and large.
Subtitle (optional) – You can add a short description.
Your name – Always include your name so the audience knows who is presenting.
Your school or university – Optional, but looks professional.
Date – Helps your audience know when the presentation was made.
Use a large, readable font. Avoid putting too many images or animations here. The goal is clarity; the same rule applies when selecting strong presentation topics.
💡Quick Tip: If your title is long, break it into two lines. For example: “The Amazing Solar System: Exploring Planets, Stars, and Beyond“
Step 3: Add your content slides.
Now, it’s time for the main part of your presentation. Content slides hold your key points.
Go to the Home tab and click New Slide. You’ll see many layout options:
Title and Content;
Two Content blocks;
Comparison;
Blank.
Choose the layout that matches your idea. Each slide should focus on one main point. Avoid cramming too much information into a single slide.
Use short text points instead of full paragraphs. Slides are visual aids, not essays. Break your topic into sections, and give each section its own slide.
Example:
If your presentation is about planets:
Slide 1: Mercury – Facts and characteristics.
Slide 2: Venus – Facts and characteristics.
Slide 3: Earth – Facts and characteristics.
Other slides can include lists, charts, or interesting facts.
☝️Remember:One slide = One idea. This keeps your presentation clean and easy to follow.
Step 4: Include visuals carefully.
Visuals make your presentation interesting. People understand images faster than words.
Go to the Insert tab, and you can choose:
Picture – Add images from your computer or online.
Shapes – Use arrows or boxes to highlight points.
Icons – Small graphics for decoration or clarification..
Charts – Show numbers clearly. Charts are easier to read than tables.
You can also add short videos if they support your topic. Videos should be brief so they don’t distract from your talk.
💡Quick Tip: One clear image per slide is often better than many small images. For example, a full-slide picture of Jupiter is more effective than five tiny pictures of all the planets together.
Step 5: Add transitions and simple animations.
Transitions and animations make your slides dynamic, but less is more when learning how to create a presentation.
Go to the Transitions tab and choose simple effects like fade or wipe.
For objects like text or images, use Animations such as fly-in or appear.
Avoid flashy effects that distract the audience. Test them in the Slide Show Preview. If something looks too busy, remove it.
Example: Make the bullet points appear one by one. This keeps the audience focused on each point instead of reading ahead.
Step 6: Write speaker notes (if needed).
Speaker notes are helpful if you don’t want to memorize everything.
At the bottom of each slide, you’ll see a box called Speaker Notes. Here, you can type exactly what you want to say. These notes won’t show on the slides. Only you see them if you use the Presenter View.
Example:
For a slide about Venus, your speaker’s note could be:
“Venus is the hottest planet in our solar system, even hotter than Mercury, because of its thick atmosphere trapping heat.”
This helps you speak naturally without crowding your slides with text. Step 7: Review and polish your slides.
Before presenting, spend time reviewing your slides. Check for:
Spelling and grammar – Mistakes make your presentation look unprofessional.
Font size – Make sure text is readable from the back of the room.
Consistent layout – Don’t use too many fonts, colors, or styles.
Content check – Compare slides with your outline to ensure nothing is missing.
Polishing makes your presentation smooth and visually appealing.
💡Quick Tip: Use alignment guides in PowerPoint to keep text and images neat.
Step 8: Rehearse your presentation.
Slides are just part of the work. You also need to practice speaking.
Use Slide Show mode to see how your presentation looks.
Practice reading your speaker notes naturally.
Time your presentation to stay within limits.
If possible, present to a friend first. Ask for feedback.
The more you rehearse, the more confident you’ll feel. Confidence helps your audience trust you and stay interested.
Example: Even if your slides are perfect, stumbling during your talk can weaken the presentation. Practice reduces mistakes.
Step 9: Save and export your work.
Finally, save your work so you don’t lose it.
Click File → Save As.
Choose a name and location. Save to your computer or cloud storage.
File types:
✅.pptx – Editable version for future changes
✅.pdf – Easy to share, keeps formatting intact
If you plan to use a different computer, exporting to PDF prevents missing fonts or layout issues.
💡Quick Tip: Always make a backup, especially if it’s for a school or work presentation.
Helpful PowerPoint Tips for Students
Small details can make a big difference when working on a school project or class presentation. Learning how to make slides the right way not only makes your work look professional but also helps your audience understand your ideas. Here are some simple but effective tips to follow.
Keep slides simple. Don’t overload them with long paragraphs or too many elements. A clean design helps your classmates and teacher focus on the main points instead of getting lost in extra words.
Use a large font size, at least 24 or higher. This way, even people sitting in the back can read without any effort. Choose clear fonts like Arial or Calibri that are easy on the eyes.
For a short school project, aim for 10–15 slides. This is usually enough to cover your ideas without rushing or dragging on too long. Quality is more important than quantity.
Remember that slides are there to support your talk, not to replace it. Avoid reading every word. Instead, use keywords, short phrases, or images, and then explain them in your own words.
Stay away from bright or flashy backgrounds that make text hard to read. A simple, light background with dark text usually works best.
Be careful when using AI-generated content. Always check the accuracy, rewrite your style, and add your thoughts. Teachers want to hear your voice.
Add examples, charts, and images to make difficult ideas easier to understand. Visuals grab attention and make your presentation more memorable.
Save an extra copy of your file on a flash drive or cloud storage. Technical problems happen, and having a backup will save you from stress.
Helpful resources for learning PowerPoint
Many resources can guide you if you want to improve your PowerPoint skills or learn how to make a PowerPoint presentation. Some are free, while others are part of the tools you already use. Here are a few places to start.
Type of resource
Examples
Microsoft tutorials
Microsoft Office YouTube Channel
Free PowerPoint templates
SlidesCarnival, Canva
School library guides
Local university or school websites, e.g., Purdue OWL
Online tutorial blogs
Envato Tuts+, Presentation Panda
YouTube features hundreds of Microsoft Office tutorials that show you how to design, format, and animate slides. Channels like Microsoft 365, Simple Slides, and Presentation Process are great for beginners.
Free PowerPoint templates are available on trusted sites such as SlidesCarnival, Slidesgo, Canva, and SlideModel. These can save time and help your presentation look professional.
Your school library often has guides on public speaking and creating visual aids. Many also provide access to eBooks or databases with examples of strong presentations.
Online tutorial blogs are another good option. Websites like HubSpot, GCFGlobal, and Envato Tuts+ share step-by-step instructions with pictures. They explain everything from adding transitions to creating charts.
With these helpful resources, you can practice, experiment, and feel more confident whenever you present.
Start a PowerPoint Presentation Without Stress and Master it Gradually
Learning the basics of creating a PowerPoint presentation may look complicated at first. But once you begin, you’ll see it is much easier than expected. Open a blank presentation, choose a simple design, and start adding slides one at a time. Focus on your main ideas instead of filling pages with too much text. Use short points, clear titles, and add visuals like images or charts to explain details.
With a little practice, you can shape your notes into a clear, visual story that connects with your audience. Always remember that a good PowerPoint presentation does not rely on fancy animations. What really matters is structure, strong visuals, and your confidence while presenting. Step by step, you’ll progress and even learn extra skills like how to cite a PPT in your work. Finally, you’ll get better and feel ready to speak with maximum impact.
FAQ
What are the main rules for making a good PowerPoint?
The five golden rules are:
Keep slides simple, don’t overload them with words.
Use large fonts so the audience can read.
Add one idea per slide, don’t mix too many topics.
Support your text with images, charts, or shapes.
Practice your speech; slides can’t replace your voice.
These simple rules help you avoid bad PowerPoint presentations and create slides that support your story with compelling arguments.
How do you make a strong PowerPoint presentation?
Start with an outline of your topic. Use short text, add pictures or charts, and keep the design clean. Pay attention to the layout. Don’t mix too many fonts or colors. Use the insert tab to add visuals like charts, icons, and videos. Practice your speech with the slides in slide show mode. A strong presentation is not about decoration. It’s about explaining your subject with clear examples and visuals.
Can I turn a Word document into a PowerPoint?
Yes. If you already wrote a paper in Word, you can use it to create slides. In PowerPoint, go to File → Open → Existing presentation or use Import from Word. Your headings can become slide titles, and sub-points can turn into bullet points. This saves time, but don’t just copy everything. You should still edit and format slides for maximum impact. Cut long sentences into short points, and add visuals.
What’s the easiest way for beginners to try how to create a PowerPoint presentation?
If you’re new, here’s a simple path:
Open PowerPoint.
Choose a blank presentation.
Add a title slide.
Click the new slide to add more.
Use text boxes for your points.
Go to the Insert tab to add images or charts.
Try a Slide Show Preview to see how it looks.
That’s it. Don’t worry about perfect design at first. The next thing after you’re comfortable is learning to edit, add transitions, and experiment with different themes.
Jamie Wallace, an academic writer with a background in Philosophy, Literature, and Art, specializes in topic development and academic writing in the humanities. His interdisciplinary perspective helps students shape strong research topics and build clear, academically grounded arguments through critical analysis.
Need to pay for PowerPoint presentations?
EduBirdie’s experts are ready to help whenever you need support.
Looking for PowerPoint presentation ideas that will make your class or professor sit up and listen during your next presentation? This guide offers 300+ engaging presentation topics, from business trends…
Starting a presentation often feels harder than creating the entire slide deck. Many students polish every slide, yet freeze when it’s time to speak. The truth is simple: how you…
Welcome to the world of calligraphy! If you’ve ever wondered how to write in cursive and make your handwriting more stylish and connected, you’re in the right place. Throughout this…