PowerPoint slide dimensions play a bigger role in presentation quality than many people realize. When the slide size doesn’t match the screen or platform, images stretch, text shifts, and the whole presentation can look unprofessional. Choosing the right slide size in PowerPoint ensures your visuals appear sharp, balanced, and easy to read.
After you are sure you are ready to step on the next level of PPT creation, we invite you to read this article. Because today, we’ll explain:
What dimensions of a PowerPoint slide mean?
How to adjust the size?
How to choose the best aspect ratio for different screens, printed materials, and online displays?
By the end, you’ll know the answers: how to avoid distorted images, black bars, and formatting issues. It’s time to create presentations that look smooth and professional on any device!
The correct dimensions of a PowerPoint slides: what are they?
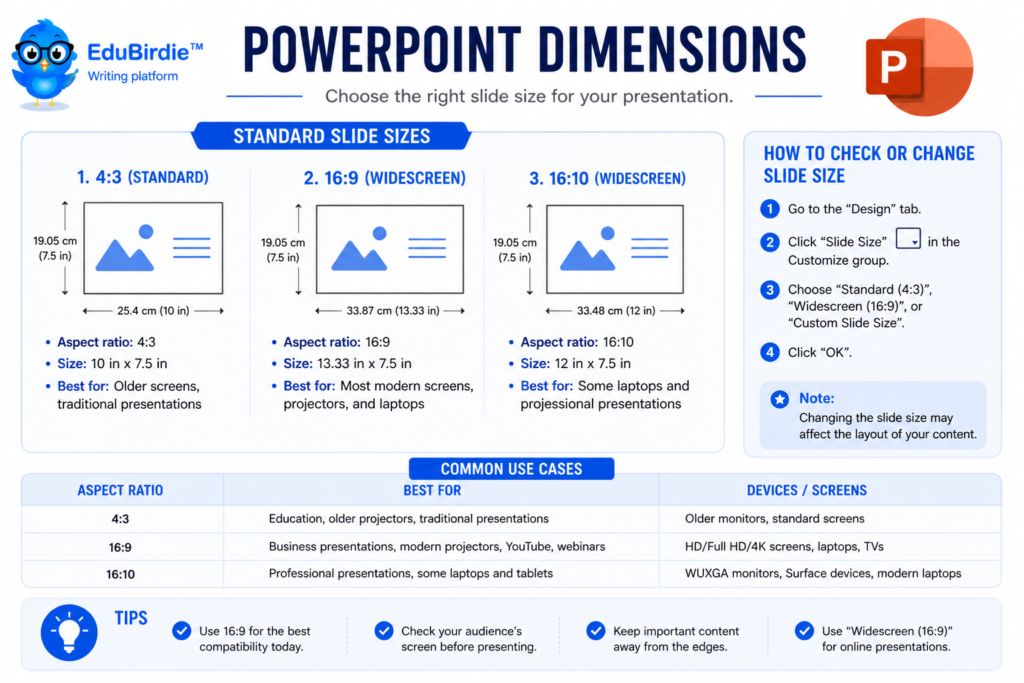
When we discuss PowerPoint slide dimensions, we refer to the shape and size of your slides. These settings affect how your presentation appears on screens, projectors, and printed materials.
In simple terms, correct slide dimensions are defined by three things.
the aspect ratio (relation between width and height);
the resolution (the sharpness of the image);
pixel size (used when exporting or displaying presentations on digital displays).
The aspect ratio is the most essential part. It indicates the width of the slide in relation to its height. For example, a 16:9 ratio is much wider than it is tall, making it ideal for modern screens and widescreen displays. A 4:3 is closer to a square shape and was commonly used on older devices and traditional laptops. In layman’s words:
16:9 is best for widescreen and modern displays;
4:3 is used for older projectors or where a more compact format is needed.
In Microsoft PowerPoint, dimensions are usually measured in inches or centimeters. However, when sharing slides online, exporting to video, or preparing graphics for social media posts, pixel dimensions are often discussed. That’s because pixel measurements are tied to screen resolution, which affects image quality. A widescreen 16:9 ratio, for example, usually corresponds to 1920 × 1080 px (Full HD) on most modern devices.
Choosing the correct size from the start ensures your content appears clean, clear, and appropriately scaled across various devices. This stays true whether you present in class, share a PPTX file with classmates, or print handouts.
Standard dimensions of PowerPoint slides for different display devices
Ratio
Dimensions (inches)
Use case
16:9
13.33 × 7.5
Default PowerPoint presentation size, best for widescreen displays, laptops, projectors, YouTube lessons, and most modern classrooms
4:3
10 × 7.5
Works with traditional projectors and basic presentations where screens are not widescreen
A3 / A4
varies
Used for printed materials, posters, and visual boards
Custom
user-defined
Helpful for vertical slides, event posters, social media formats, or any unique layout
The best custom slide size for your case
Before moving on, EduBirdie thinks it is essential to discuss the PPT dimensions further. We will help you choose which size actually works best for your presentation. The golden rule is: the “right” size isn’t about what looks nice by default, it’s about where your presentation will be displayed.
Different types of presentations also influence the ideal slide dimensions. For example, business reports, educational lectures, marketing pitches, and social media presentations may each require different formats to match their purpose and display platform.
Here’s a simple breakdown of what to use and when:
Size
Aspect Ratio
When to Use It
Why It Works
Widescreen (16:9)
16:9
Online lessons, laptops, projectors, recorded presentations, webinars, YouTube
Most modern screens are already widescreen, so your slides fill the screen perfectly.
Standard (4:3)
4:3
Older school projectors, printed classroom materials, and basic screens
Keeps slides neatly framed without stretching on older displays.
Custom Dimensions
varies
Posters, vertical presentations, research displays, social media slides
Gives freedom to design layouts that don’t follow the typical widescreen format.
If your presentation will be shown on modern displays (laptops, smart projectors, classroom TVs), opt for 16:9. It’s the most reliable choice and aligns with Full HD resolution (1920×1080 pixels). This format creates a wider workspace, making it easier to balance text and images without crowding.
If your class or school still uses older projectors (and yes, many do), 4:3 will prevent awkward borders on screen. It’s closer to a square, so it feels more compact and traditional.
Custom sizes come into play when your layout is not a typical horizontal one. For example:
A vertical poster for a science fair poster.
A long infographic layout for a portfolio.
A square canvas for social media (e.g., Instagram).
In these cases, setting custom width and height helps your content fit the output perfectly, rather than squeezing into a standard slide.
Real-world example:
When preparing slides for a webinar or YouTube lesson, always use a 16:9 widescreen format. It matches video players, prevents black borders, and keeps your visuals crisp when recorded or streamed.
Lastly, before you move on, pause and ask one question: Where will this presentation be viewed? That answer alone usually indicates the correct slide size.
What are the pixel dimensions?
So far, we looked at sizes in inches, because that’s how Microsoft PowerPoint displays them inside the editor. But when your presentation goes online, becomes a video, or is viewed on different devices, the conversation changes from inches to pixels. That’s because screens show images using tiny dots called pixels, and the specific pixel dimensions determine how sharp your presentation looks on a display.
The key to understanding this is DPI (dots per inch). PowerPoint typically operates at 96 DPI, meaning that every inch on the slide corresponds to 96 pixels when exported. When we convert the size from inches to pixels, we’re basically multiplying by 96.
So, what are the dimensions of a PowerPoint slide? Here are the typical pixel dimensions for the two most common aspect ratios:
Aspect Ratio
Size (inches)
Pixel Dimensions (approx.)
Where It Looks Best
16:9 (Widescreen)
13.33 × 7.5
1920 × 1080 px (Full HD)
Laptops, widescreen monitors, projectors, and recorded lessons
These sizes are used so often that they’ve become default slide sizes in many schools and classrooms. Shortly:
Higher pixel dimensions = sharper images, especially when projecting or sharing your presentations online.
Lower pixel dimensions = smaller file size, which is useful when emailing or uploading your presentation to a platform with upload limits.
If your PowerPoint dimensions don’t match the screen’s resolution, your content may appear stretched, blurred, or boxed in by black bars!
Indeed, resolution affects clarity. If you want an impactful presentation that looks clean and professional, it’s worth choosing pixel sizes that match the display you’ll be using.
Quick example:
If you’re preparing slides for a recorded lecture, webinar, or YouTube video, choose 1920 × 1080 (Full HD) resolution. It matches most video platforms and produces a smooth, high-quality appearance.
If you’re designing for printing, pixel size becomes less important. The focus shifts to physical dimensions, since printers care about inches and centimeters, not pixels.
Want to review the basics first? You can check this helpful guide on how to create a PowerPoint presentation from EduBirdie (especially useful if you’re still getting comfortable with layout and structure).
Once you understand the PPT dimensions, adjusting them later will be much easier. And when you feel ready, scroll down to learn about the process of changing sizes quickly.
How to change PPT slide size: find slide dimensions that are perfect for your PowerPoint presentation
Okay, but how to actually adjust the dimensions of a PowerPoint slide. Essentially, Microsoft PowerPoint streamlines our workflow, making it easy to switch between slide sizes. Doesn’t matter if you need a widescreen layout for modern displays or a square-like format for printed handouts. You can do it in a few clicks with PowerPoint:
Open your PowerPoint presentation.
Make sure you are working in the correct PPTX file so the changes apply to the right project.
Go to the Design tab in the top menu.
The design tab controls visual layout settings, including slide formatting and theme adjustments.
Select Slide Size → Custom Slide Size.
You will see a dropdown menu in the right corner. Click on it to open the dialog box for adjusting desired dimensions.
Choose your desired slide size.
You can select a custom slide size:
Standard (4:3) — best for older projectors and traditional classroom screens
Widescreen (16:9) — ideal for laptops, widescreen monitors.
Or choose Custom Size if you need custom dimensions for posters, vertical posters, or social media.
Click OK and choose how PowerPoint should handle the content.
PowerPoint will ask:
Maximize (fills space but may crop images or text).
Ensure Fit (avoids cutting elements, but may leave small margins).
If your content is dense or includes charts, ensure Fit is set to a safer value.
Review all the slides!
Why review your custom dimensions after resizing?
When you change the PowerPoint slide size, the software automatically adjusts the spacing. However:
Stretched Images can appear.
Fonts may resize slightly.
Layouts can shift out of alignment.
To prevent this, check:
Image proportions (avoid distortion).
Alignment of text boxes.
Title and body spacing.
Charts and tables placement.
Taking one minute to review ensures smooth transitions between individual slides and keeps your presentation looking polished on different devices.
Adjust slide size without making these 4 mistakes
At this point, you are primarily a professional in PPT dimensions. However, even when you understand aspect ratio and resolution, a wrong slide size can still cause some problems. It is okay to make mistakes, but we would be glad if you checked them and corrected them before submitting your work. The good news is that they’re easy to fix once you know what to look for!
Mistake
Description
How to Fix
Wrong aspect ratio
Elements look stretched, squished, or cropped because the dimension matches were not set correctly. This often happens when switching between 4:3 and 16:9 after designing.
Set the aspect ratio (16:9 or 4:3) before designing. If you have already created your slides, use Design → Slide Size → Custom Slide Size and adjust carefully.
Low-resolution images
Pictures look blurry or pixelated.
Use higher-resolution images, ideally matching Full HD (1920 × 1080 px). Replace low-quality pictures and avoid over-enlarging small images.
Wrong orientation (landscape vs. portrait)
A slide built horizontally may look awkward on a vertical display (or vice versa). This often affects posters or printed boards.
Switch orientation in Design → Slide Size → Custom Slide Size and select Portrait or Landscape depending on your project.
Overcrowded slides
Too much text or too many images can reduce readability and distract from key points.
Add white space, use consistent margins, split content into multiple slides, and highlight only the most important ideas.
Taking one extra minute to check these details can prevent your presentations from looking stretched, blurry, or cluttered. Once you know how to change dimensions of PowerPoint slide correctly and avoid these pitfalls, your presentations will look smoother and more professional across all devices.
Advanced tips to change slide size
Once you understand how to work with PowerPoint slide dimensions, it’s time to make your presentation lighter, sharper, and easier to share. Lastly, we want to give you some additional tips. They will help your PPT stand out!
Compress Images Properly.
Use “Compress Pictures” to reduce file size while keeping quality. Choose the resolution that matches your display or printing needs.
Choose Vector Graphics (SVG).
SVG icons stay crisp regardless of the dimensions of a PowerPoint slide or scaling changes — perfect when working across screens with a different aspect ratio.
Link Videos Instead of Embedding.
Embedding increases file size. Linking keeps the presentation smooth and portable.
Use “Compress Media.”
Before saving the PowerPoint file, open File → Info → Compress Media to reduce video and audio size.
Run “Inspect Document.”
This removes hidden data and ensures your final PPT dimensions presentation is clean and professional.
And remember: if you need help to improve structure or flow, you can also explore guides on creating polished slides at EduBirdie! We are always there to make your presentation.
FAQ
Are Microsoft PowerPoint Slides 16:9 Or 4:3?
Most modern templates use 16:9 widescreen, while older ones use 4:3.
What Is the 10/20/30 Rule of PowerPoint?
10 slides, 20 minutes, 30-point font — to keep it short and clear.
Is a PowerPoint Slide 1920×1080?
Yes, that’s the default Full HD dimension for 16:9.
How to Do “Fit To Screen” in PowerPoint?
Go to Design → Slide Size → Ensure Fit for auto-scaling.
What Is the Aspect Ratio?
Aspect ratio refers to the proportion between slide width and height (e.g., 16:9, 4:3).
Thanks for your feedback!
Was this helpful?
Need powerpoint presentation writing services?
EduBirdie’s experts are ready to help whenever you need support.
Starting a presentation often feels harder than creating the entire slide deck. Many students polish every slide, yet freeze when it’s time to speak. The truth is simple: how you…
Looking for PowerPoint presentation ideas that will make your class or professor sit up and listen during your next presentation? This guide offers 300+ engaging presentation topics, from business trends…
Knowing how to make slides is an essential skill for students today. Slides make your ideas easier to understand through clear visuals, whether for a class project, a research defense,…